
Getting started with Open Data Hub
Table of Contents
- Logging in to Open Data Hub
- The Open Data Hub user interface
- Notifications in Open Data Hub
- Creating a data science project
- Creating a project workbench
- Tutorials for data scientists
- Enabling services connected to Open Data Hub
- Disabling applications connected to Open Data Hub
- Support requirements and limitations
Logging in to Open Data Hub
Log in to Open Data Hub from a browser for easy access to Jupyter and your data science projects.
Procedure
-
Browse to the Open Data Hub instance URL and click Log in with OpenShift.
-
If you are a data scientist user, your administrator must provide you with the Open Data Hub instance URL, for example,
https:://odh-dashboard-odh.apps.ocp4.example.com. -
If you have access to OpenShift Container Platform, you can browse to the OpenShift Container Platform web console and click the Application Launcher (
 ) → Open Data Hub.
-
-
Click the name of your identity provider, for example,
GitHub. -
Enter your credentials and click Log in (or equivalent for your identity provider).
If you have not previously authorized the
odh-dashboardservice account to access your account, the Authorize Access page appears prompting you to provide authorization. Inspect the permissions selected by default, and click the Allow selected permissions button.
Verification
-
Open Data Hub opens on the Enabled applications page.
Troubleshooting
-
If you see
An authentication error occurredorCould not create userwhen you try to log in:-
You might have entered your credentials incorrectly. Confirm that your credentials are correct.
-
You might have an account in more than one configured identity provider. If you have logged in with a different identity provider previously, try again with that identity provider.
-
The Open Data Hub user interface
The Open Data Hub interface is based on the OpenShift web console user interface.
The Open Data Hub user interface is divided into several areas:
-
The global navigation bar, which provides access to useful controls, such as Help and Notifications.
Figure 1. The global navigation bar -
The side navigation menu, which contains different categories of pages available in Open Data Hub.
 Figure 2. The side navigation menu
 -
The main display area, which displays the current page and shares space with any drawers currently displaying information, such as notifications or quick start guides. The main display area also displays the Notebook server control panel where you can launch Jupyter by starting and configuring a notebook server. Administrators can also use the Notebook server control panel to manage other users' notebook servers.
 Figure 3. The main display area
Global navigation
There are four items in the top navigation:
-
The Toggle side navigation menu button (
 ) toggles whether or not the side navigation is displayed.
 -
The Notifications button (
 ) opens and closes the Notifications drawer, letting you read current and previous notifications in more detail.
 -
The Help menu (
 ) provides a link to access the Open Data Hub documentation.
 -
The User menu displays the name of the currently logged-in user and provides access to the Log out button.
Side navigation
There are three main sections in the side navigation:
- Applications → Enabled
-
The Enabled page displays applications that are enabled and ready to use on Open Data Hub. This page is the default landing page for Open Data Hub.
Click the Launch application button on an application card to open the application interface in a new tab. If an application has an associated quick start tour, click the drop-down menu on the application’s card and select Open quick start to access it. This page also displays applications and components that have been disabled by your administrator. Disabled applications are denoted with
Disabledon the application’s card. Click Disabled on the application’s card to access links allowing you to remove the card itself, and to re-validate its license, if the license had previously expired. - Applications → Explore
-
The Explore page displays applications that are available for use with Open Data Hub. Click on a card for more information about the application or to access the Enable button. The Enable button is only visible if your administrator and enabled an application at the Open Data Hub level.
- Data science projects
-
The Data science projects page allows you to organize your data science work into a single project. From this page, you can create and manage data science projects. You can also enhance the capabilities of your data science project by adding workbenches, adding storage to your project’s cluster, adding data connections, and adding model servers.
- Model Serving
-
The Model Serving page allows you to manage and view the status of your deployed models. You can use this page to deploy data science models to serve intelligent applications, or to view existing deployed models. You can also determine the inference endpoint of a deployed model.
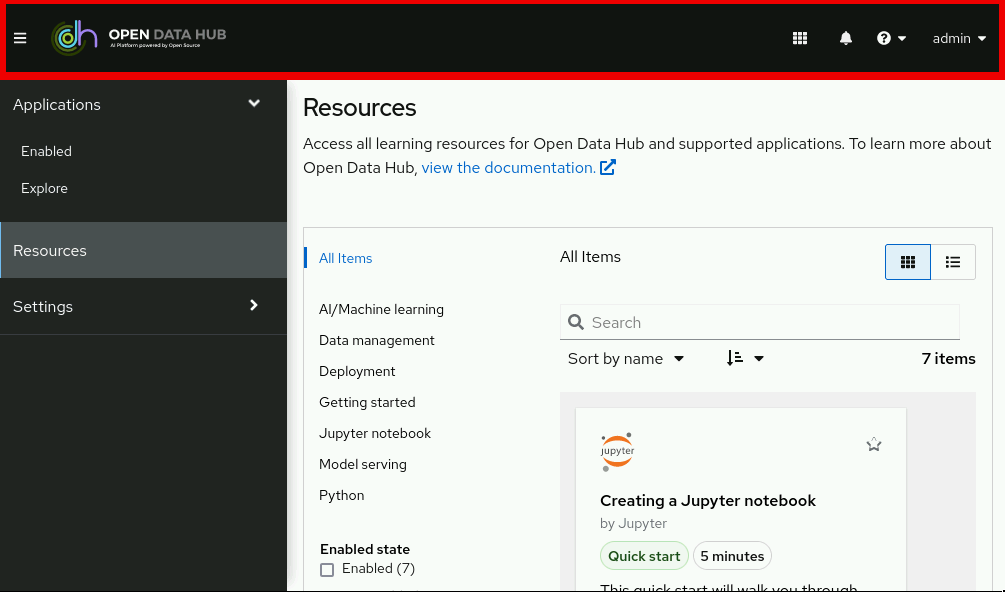
- Resources
-
The Resources page displays learning resources such as documentation, how-to material, and quick start tours. You can filter visible resources using the options displayed on the left, or enter terms into the search bar.
- Settings → Notebook images
-
The Notebook image settings page allows you to configure custom notebook images that cater to your project’s specific requirements. After you have added custom notebook images to your deployment of Open Data Hub, they are available for selection when creating a notebook server.
- Settings → Cluster settings
-
The Cluster settings page allows you perform the following administrative tasks on your cluster:
-
Enable or disable Red Hat’s ability to collect data about Open Data Hub usage on your cluster.
-
Configure how resources are claimed within your cluster by changing the default size of the cluster’s persistent volume claim (PVC).
-
Reduce resource usage in your Open Data Hub deployment by stopping notebook servers that have been idle.
-
Schedule notebook pods on tainted nodes by adding tolerations.
-
- Settings → User management
-
The User and group settings page allows you to define Open Data Hub user group and admin group membership.
Notifications in Open Data Hub
Open Data Hub displays notifications when important events happen in the cluster.
Notification messages are displayed in the lower left corner of the Open Data Hub interface when they are triggered.
If you miss a notification message, click the Notifications button (![]() ) to open the Notifications drawer and view unread messages.
) to open the Notifications drawer and view unread messages.
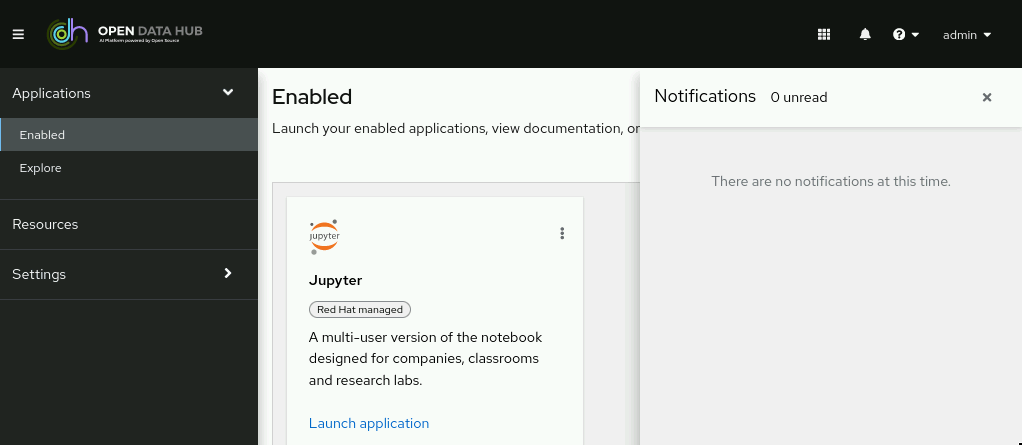
Figure 4. The Notifications drawer
Creating a data science project
To start your data science work, create a data science project. Creating a project helps you organize your work in one place. You can also enhance the capabilities of your data science project by adding workbenches, adding storage to your project’s cluster, adding data connections, and adding model servers.
Prerequisites
-
You have logged in to Open Data Hub.
-
If you are using specialized Open Data Hub groups, you are part of the user group or admin group (for example,
odh-users) in OpenShift.
Procedure
-
From the Open Data Hub dashboard, click Data Science Projects.
The Data science projects page opens.
-
Click Create data science project.
The Create a data science project dialog opens.
-
Enter a name for your data science project.
-
Optional: Edit the resource name for your data science project. The resource name must consist of lowercase alphanumeric characters, -, and must start and end with an alphanumeric character.
-
Enter a description for your data science project.
-
Click Create.
The Project details page opens. From here, you can create workbenches, add cluster storage, and add data connections to your project.
Verification
-
The data science project that you created is displayed on the Data science projects page.
Creating a project workbench
To examine and work with data models in an isolated area, you can create a workbench. This workbench enables you to create a new Jupyter notebook from an existing notebook container image to access its resources and properties. For data science projects that require data to be retained, you can add container storage to the workbench you are creating.
Prerequisites
-
You have logged in to Open Data Hub.
-
If you are using specialized Open Data Hub groups, you are part of the user group or admin group (for example,
odh-users) in OpenShift. -
You have created a data science project that you can add a workbench to.
Procedure
-
From the Open Data Hub dashboard, click Data Science Projects.
The Data science projects page opens.
-
Click the name of the project that you want to add the workbench to.
The Details page for the project opens.
-
Click Create workbench in the Workbenches section.
The Create workbench page opens.
-
Configure the properties of the workbench you are creating.
-
Enter a name for your workbench.
-
Enter a description for your workbench.
-
Select the notebook image to use for your workbench server.
-
Select the container size for your server.
-
Optional: Select and specify values for any new environment variables.
-
Configure the storage for your Open Data Hub cluster.
-
Select Create new persistent storage to create storage that is retained after you log out of Open Data Hub. Fill in the relevant fields to define the storage.
-
Select Use existing persistent storage to reuse existing storage then select the storage from the Persistent storage list.
-
-
-
Click Create workbench.
Verification
-
The workbench that you created appears on the Details page for the project.
-
Any cluster storage that you associated with the workbench during the creation process appears on the Details page for the project.
-
The Status column, located in the Workbenches section of the Details page, displays a status of Starting when the workbench server is starting, and Running when the workbench has successfully started.
Launching Jupyter and starting a notebook server
Launch Jupyter and start a notebook server to start working with your notebooks.
Prerequisites
-
You have logged in to Open Data Hub.
-
You know the names and values you want to use for any environment variables in your notebook server environment, for example,
AWS_SECRET_ACCESS_KEY. -
If you want to work with a very large data set, work with your administrator to proactively increase the storage capacity of your notebook server.
Procedure
-
Locate the Jupyter card on the Enabled applications page.
-
Click Launch application.
If you see Error 403: Forbidden, you are not in the default user group or the default administrator group for Open Data Hub. Contact your administrator so that they can add you to the correct group.
If you have not previously authorized the
jupyter-nb-<username>service account to access your account, the Authorize Access page appears prompting you to provide authorization. Inspect the permissions selected by default, and click the Allow selected permissions button.If you credentials are accepted, the Notebook server control panel opens displaying the Start a notebook server page.
-
Start a notebook server.
This is not required if you have previously opened Jupyter.
-
Select the Notebook image to use for your server.
-
If the notebook image contains multiple versions, select the version of the notebook image from the Versions section.
NoteWhen a new version of a notebook image is released, the previous version remains available and supported on the cluster. This gives you time to migrate your work to the latest version of the notebook image.
-
Select the Container size for your server.
-
Optional: Select the Number of GPUs (graphics processing units) for your server.
ImportantUsing GPUs to accelerate workloads is only supported with the PyTorch, TensorFlow, and CUDA notebook server images.
-
Optional: Select and specify values for any new Environment variables.
For example, if you plan to integrate with Red Hat OpenShift Streams for Apache Kafka, create environment variables to store your Kafka bootstrap server and the service account username and password here.
The interface stores these variables so that you only need to enter them once. Example variable names for common environment variables are automatically provided for frequently integrated environments and frameworks, such as Amazon Web Services (AWS).
ImportantEnsure that you select the Secret checkbox for any variables with sensitive values that must be kept private, such as passwords.
-
Optional: Select the Start server in current tab checkbox if necessary.
-
Click Start server.
The Starting server progress indicator appears. If you encounter a problem during this process, an error message appears with more information. Click Expand event log to view additional information about the server creation process. Depending on the deployment size and resources you requested, starting the server can take up to several minutes. Click Cancel to cancel the server creation. After the server starts, the JupyterLab interface opens.
WarningYou can be logged in to Jupyter for a maximum of 24 hours. After 24 hours, your user credentials expire, you are logged out of Jupyter, and your notebook server pod is stopped and deleted regardless of any work running in the notebook server. To help mitigate this, your administrator can configure OAuth tokens to expire after a set period of inactivity. See Configuring the internal OAuth server for more information.
-
Verification
-
The JupyterLab interface opens in a new tab.
Troubleshooting
-
If you see the "Unable to load notebook server configuration options" error message, contact your administrator so that they can review the logs associated with your Jupyter pod and determine further details about the problem.
Options for notebook server environments
When you start Jupyter for the first time, or after stopping your notebook server, you must select server options in the Start a notebook server wizard so that the software and variables that you expect are available on your server. This section explains the options available in the Start a notebook server wizard in detail.
The Start a notebook server page is divided into several sections:
- Notebook image
-
Specifies the container image that your notebook server is based on. Different notebook images have different packages installed by default. See Notebook image options for details.
- Deployment size
-
Specifies the compute resources available on your notebook server.
Container size controls the number of CPUs, the amount of memory, and the minimum and maximum request capacity of the container.
- Environment variables
-
Specifies the name and value of variables to be set on the notebook server. Setting environment variables during server startup means that you do not need to define them in the body of your notebooks, or with the Jupyter command line interface. See Recommended environment variables for a list of reserved variable names for each item in the Environment variables list.
| Image name | Preinstalled packages |
|---|---|
CUDA |
|
Minimal Python (default) |
|
PyTorch |
|
Standard Data Science |
|
TensorFlow |
|
| Environment variable option | Recommended variable names |
|---|---|
AWS |
|
Tutorials for data scientists
To help you get started quickly, you can access learning resources for Open Data Hub and its supported applications. These resources are available on the Resources tab of the Open Data Hub user interface.
| Resource Name | Description |
|---|---|
Creating a Jupyter notebook |
Create a Jupyter notebook in JupyterLab. |
Deploying a sample Python application using Flask and OpenShift |
Deploy your data science model out of a Jupyter notebook and into a Flask application to use as a development sandbox. |
| Resource Name | Description |
|---|---|
How to install Python packages on your notebook server |
Learn how to install additional Python packages on your notebook server. |
How to update notebook server settings |
Learn how to update the settings or the notebook image on your notebook server. |
How to use data from Amazon S3 buckets |
Learn how to connect to data in S3 Storage using environment variables. |
How to view installed packages on your notebook server |
Learn how to see which packages are installed on your running notebook server. |
Accessing tutorials
You can access learning resources for Open Data Hub and supported applications.
Prerequisites
-
Ensure that you have logged in to Open Data Hub.
-
You have logged in to the OpenShift Container Platform web console.
Procedure
-
On the Open Data Hub home page, click Resources.
The Resources page opens.
-
Click Access tutorial on the relevant card.
Verification
-
You can view and access the learning resources for Open Data Hub and supported applications.
Enabling services connected to Open Data Hub
You must enable SaaS-based services, such as Red OpenShift Streams for Apache Kafka and Anaconda, before using them with Open Data Hub. On-cluster services are enabled automatically.
Typically, you can install services, or enable services connected to Open Data Hub using one of the following methods:
-
Enabling the service from the Explore page on the Open Data Hub dashboard, as documented in this procedure.
-
Installing the service’s operator from OperatorHub. OperatorHub is a web console for cluster administrators to discover and select Operators to install on their cluster. It is deployed by default in OpenShift Container Platform (Installing from OperatorHub using the web console).
-
Installing the service’s operator from Red Hat Marketplace (Install operators).
-
Installing the service as an Operator to your OpenShift Container Platform cluster (Adding Operators to a cluster).
For most services, the service endpoint is available on the service’s tile on the Enabled page of Open Data Hub. Certain services cannot be accessed directly from their tiles, for example, OpenVINO and Anaconda provide notebook images for use in Jupyter and do not provide an endpoint link from their tile. Additionally, for services such as OpenShift Streams for Apache Kafka, it may be useful to store these endpoint URLs as environment variables for easy reference in a notebook environment.
Some independent software vendor (ISV) applications must be installed in specific Open Data Hub Operator namespaces. However, do not install ISV applications in namespaces associated with Open Data Hub Operators unless you are specifically directed to do so on the application’s card on the dashboard.
To help you get started quickly, you can access the service’s learning resources and documentation on the Resources page, or by clicking the relevant link on the service’s tile on the Enabled page.
Prerequisites
-
You have logged in to Open Data Hub.
-
Your administrator has installed or configured the service on your OpenShift cluster.
Procedure
-
On the Open Data Hub home page, click Explore.
The Explore page opens.
-
Click the card of the service that you want to enable.
-
Click Enable on the drawer for the service.
-
If prompted, enter the service’s key and click Connect.
-
Click Enable to confirm that you are enabling the service.
Verification
-
The service that you enabled appears on the Enabled page.
-
The service endpoint is displayed on the service’s tile on the Enabled page
Disabling applications connected to Open Data Hub
You can disable applications and components so that they do not appear on the Open Data Hub dashboard when you no longer want to use them, for example, when data scientists no longer use an application or when the application’s license expires.
Disabling unused applications allows your data scientists to manually remove these application cards from their Open Data Hub dashboard so that they can focus on the applications that they are most likely to use.
|
Important
|
Do not follow this procedure when disabling the following applications:
|
Prerequisites
-
You have logged in to the Open Data Hub web console.
-
You are part of the
cluster-adminsuser group in OpenShift Container Platform. -
You have installed or configured the service on your Open Data Hub cluster.
-
The application or component that you want to disable is enabled and appears on the Enabled page.
Procedure
-
In the OpenShift Container Platform web console, change into the Administrator perspective.
-
Change into the
odhproject. -
Click Operators → Installed Operators.
-
Click on the operator that you want to uninstall. You can enter a keyword into the Filter by name field to help you find the operator faster.
-
Delete any operator resources or instances by using the tabs in the operator interface.
During installation, some operators require the administrator to create resources or start process instances using tabs in the operator interface. These must be deleted before the operator can uninstall correctly.
-
On the Operator Details page, click the Actions drop-down menu and select Uninstall Operator.
An Uninstall Operator? dialog box is displayed.
-
Select Uninstall to uninstall the operator, operator deployments, and pods. After this is complete, the operator stops running and no longer receives updates.
|
Important
|
Removing an operator does not remove any of that operator’s custom resource definitions or managed resources. Custom resource definitions and managed resources still exist and must be cleaned up manually. Any applications deployed by your operator and any configured off-cluster resources continue to run and must be cleaned up manually. |
Verification
-
The operator is uninstalled from its target clusters.
-
The operator no longer appears on the Installed Operators page.
-
The disabled application is no longer available for your data scientists to use, and is marked as
Disabledon the Enabled page of the Open Data Hub dashboard. This action may take a few minutes to occur following the removal of the operator.
Removing disabled applications from Open Data Hub
After your administrator has disabled your unused applications, you can manually remove them from the Open Data Hub dashboard. Disabling and removing unused applications allows you to focus on the applications that you are most likely to use.
Prerequisites
-
Ensure that you have logged in to Open Data Hub.
-
You have logged in to the OpenShift Container Platform web console.
-
Your administrator has previously disabled the application that you want to remove.
Procedure
-
In the Open Data Hub interface, click Enabled.
The Enabled page opens. Disabled applications are denoted with
Disabledon the application’s card. -
Click Disabled on the card of the application that you want to remove.
-
Click the link to remove the application card.
Verification
-
The disabled application’s card no longer appears on the Enabled page.
Support requirements and limitations
Supported browsers
Open Data Hub supports the latest version of the following browsers:
-
Google Chrome
-
Mozilla Firefox
-
Safari
Supported services
Open Data Hub supports the following services:
| Service Name | Description |
|---|---|
Anaconda Professional Edition |
Anaconda Professional Edition is a popular open source package distribution and management experience that is optimized for commercial use. |
IBM Watson Studio |
IBM Watson Studio is a platform for embedding AI and machine learning into your business and creating custom models with your own data. |
Intel® oneAPI AI Analytics Toolkits |
The AI Kit is a set of AI software tools to accelerate end-to-end data science and analytics pipelines on Intel® architectures. |
Jupyter |
Jupyter is a multi-user version of the notebook designed for companies, classrooms, and research labs. |
Pachyderm |
Use Pachyderm’s data versioning, pipeline and lineage capabilities to automate the machine learning life cycle and optimize machine learning operations. |
Red Hat OpenShift API Management |
OpenShift API Management is a service that accelerates time-to-value and reduces the cost of delivering API-first, microservices-based applications. |
Red Hat OpenShift Streams for Apache Kafka |
OpenShift Streams for Apache Kafka is a service for streaming data that reduces the cost and complexity of delivering real-time applications. |
OpenVINO |
OpenVINO is an open-source toolkit to help optimize deep learning performance and deploy using an inference engine onto Intel hardware. |
Starburst Galaxy |
Starburst Galaxy is a fully managed service to run high-performance queries across your various data sources using SQL. |
Supported packages
Notebook server images in Open Data Hub are installed with Python 3.8 by default.
You can install packages that are compatible with Python 3.8 on any notebook server that has the binaries required by that package.
You can install packages on a temporary basis by using the pip install command. You can also provide a list of packages to the pip install command using a requirements.txt file.
You must re-install these packages each time you start your notebook server.
You can remove packages by using the pip uninstall command.